Hey there, fellow DIY enthusiasts! Are you dreaming of a shed but staring down a budget that makes you sweat? Don't worry, you're not alone. We've all been there. Building a shed yourself is a fantastic way to save money and have a sense of accomplishment, and it's definitely achievable even on a tight budget.
This guide will walk you through building an 8x10 shed â€" a perfect size for storing tools, bikes, or maybe even your crafting supplies â€" without breaking the bank.
First Things First: The Plan
Before you start hammering and sawing, you need a solid plan. Here's what you need to consider:
The Foundation: This is the base of your shed, and it's crucial for stability and longevity. Concrete is the most durable option, but it's also the most expensive. A simple, pressure-treated wood foundation is a good budget-friendly alternative. We'll discuss this in more detail later.
The Framing: The walls and roof of your shed are built with framing lumber. Think about using affordable options like pressure-treated pine or spruce for durability and cost-effectiveness.
The Siding: This is the visible exterior of your shed, and it’s where you can get creative. Use budget-friendly materials like vinyl, metal, or even plywood with paint for a classic look.
The Roofing: Asphalt shingles are the most common and affordable choice for shed roofing. For a more rustic look, consider using metal roofing.
Let's Get Down to Business: The Foundation
Your foundation is the most critical part of the shed, so don't skimp. Here's a simple and budget-friendly approach:
1. Leveling the Ground: Use a level to ensure your construction site is completely level. You'll want to adjust the soil using a shovel or tamp down gravel if needed.
2. Building the Frame: Create a frame using pressure-treated 4x4 posts, spaced 2 feet apart. Secure these posts with horizontal beams, also made of pressure-treated wood, creating a strong rectangle that matches the dimensions of your shed. Make sure to anchor the posts to the ground using concrete anchors or bolts for extra stability.
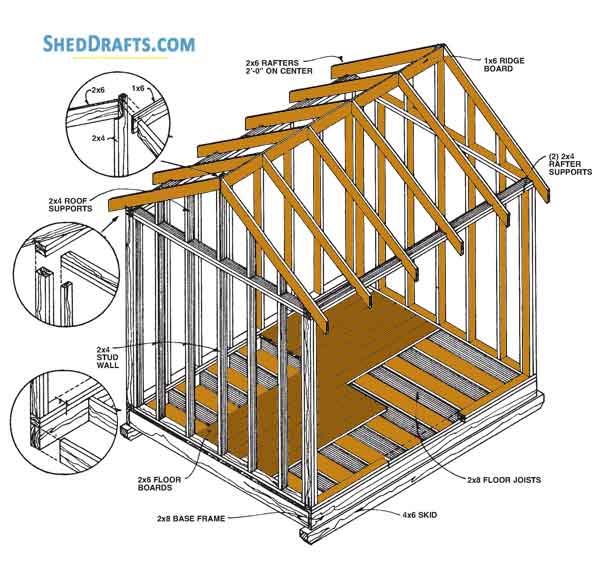
3. Adding the Floor Joists: Now you’re ready to build your floor. Attach 2x6 joists to the frame, spaced 16 inches apart, ensuring they’re level.
4. The Flooring: Choose a cost-effective option like plywood for your flooring. Make sure you use exterior grade plywood for better moisture resistance.
Time to Get Vertical: The Walls
With the foundation set, it's time to build your walls.
1. Cutting the Wall Framing: Use 2x4 studs for the walls, and cut them to the correct height. For your 8x10 shed, each wall will need eight studs spaced 16 inches apart.
2. Assembling the Walls: Attach the studs to the bottom plate (the horizontal beam on the foundation), making sure they're plumb and square. Then, attach the top plate (another horizontal beam), completing the wall frame.
3. Adding the Sheathing: Now it's time to add sheathing, which is the material that goes over the framing to give your walls more stability and provide a surface for your siding. Plywood or OSB are popular choices for sheathing.
4. Installing the Siding: This is where you get to personalize your shed. Vinyl siding is a great budget-friendly option, offering a variety of styles and colors. If you’re going for a rustic look, you could use wooden siding or even recycled materials.
Reaching for the Sky: The Roof
Your shed is almost done! Let's build that roof.
1. Framing the Roof: Start by cutting rafters (sloped beams that support the roof) to the appropriate length. For an 8x10 shed, you'll need eight rafters for each side of the roof.
2. Installing the Rafters: Attach the rafters to the top plates of the walls, making sure they are evenly spaced and plumb.
3. Adding the Roof Sheathing: Apply plywood or OSB sheathing to the rafters to create a smooth surface for your shingles.
4. Installing the Roofing: Asphalt shingles are a budget-friendly roofing option and are easy to install. Just follow the manufacturer's instructions for a proper and weather-resistant installation.
The Finishing Touches:
Your shed is almost complete! Here are the final steps:
Doors and Windows: Choose a simple and affordable door and windows that fit your budget. You can even consider using salvaged doors or windows for a unique look.
Paint or Stain: Apply paint or stain to your shed for a finished look and to protect the wood from the elements.
Adding Extras: Consider adding features like a porch, shelves, or even a small workbench for a more functional and personalized shed.
Pro Tips for Budget-Friendly Building:
Shop Around: Compare prices at different lumber yards and hardware stores to get the best deals.
Buy in Bulk: Buying materials in bulk can often save you money.
Utilize Salvage: Look for salvaged lumber or materials at local salvage yards for significant savings.
Don't Be Afraid to Ask for Help: Enlist the help of friends or family members for certain tasks to save on labor costs.
The Rewards of Building Your Own Shed:
Building your own shed might seem daunting at first, but the rewards are well worth the effort. Not only will you save money, but you'll also gain a sense of accomplishment, create a personalized space for your needs, and learn valuable DIY skills.
So, grab your tools, gather your materials, and get ready to build your dream shed! Remember, with careful planning, a bit of DIY spirit, and a touch of creativity, you can create a beautiful and functional shed without breaking the bank.


No comments:
Post a Comment