How to Build a Pallet Shed: Step-by-Step Guide for Beginners

How to Build a Pallet Shed: Step-by-Step Guide for Beginners

How to Build a Pallet Shed: A Comprehensive Guide for Beginners

Constructing a pallet shed offers a cost-effective and environmentally friendly solution for additional storage space. This guide provides a detailed, step-by-step process for beginners, emphasizing safety and structural integrity. While utilizing reclaimed pallets presents inherent challenges, careful planning and execution can result in a sturdy and functional shed.

Phase 1: Planning and Preparation

The success of any construction project hinges on meticulous planning. This phase focuses on design, material acquisition, and site preparation.

1.1 Shed Design and Dimensions

Begin by defining the shed's purpose and desired dimensions. Consider the items to be stored and the available space on your property. Sketch a basic plan, noting the dimensions of the walls, roof, and door. A simple rectangular design is ideal for beginners. Accurate measurements are critical for a structurally sound shed.

1.2 Pallet Selection and Assessment

Sourcing suitable pallets is crucial. Inspect each pallet thoroughly for signs of damage, rot, or infestation. Prioritize pallets made of pressure-treated lumber for enhanced durability and pest resistance. Avoid pallets marked with the "HT" symbol (heat treated), as these may contain chemical treatments unsuitable for direct contact. Aim for pallets of consistent size and quality for easier assembly.

Calculate the approximate number of pallets needed based on your design. Remember to account for both the walls and the roof. It's advisable to have extra pallets on hand to account for potential damage or imperfections during construction.

1.3 Site Preparation and Foundation

Choose a level and well-drained location for your shed. Clear the area of vegetation, debris, and rocks. A stable foundation is paramount. Options include:

  • Concrete Slab: Provides the most robust and level base, but requires more significant investment and preparation.
  • Gravel Base: A simpler and less expensive option, involving laying a layer of compacted gravel to create a level surface.
  • Wooden Skids or Sleepers: A cost-effective solution, requiring placement of treated timber on a leveled gravel base to elevate the shed and improve drainage.

The chosen foundation method will dictate the initial steps of the construction process.

Phase 2: Shed Construction

This phase details the assembly of the shed's walls, roof, and door.

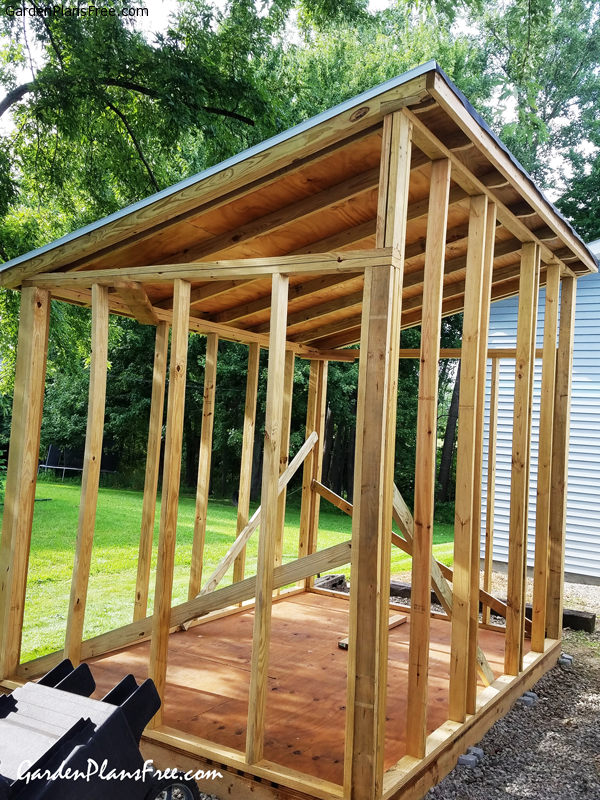
2.1 Wall Construction

Begin by assembling the wall frames. This involves carefully connecting pallets vertically, ensuring they are aligned and securely fastened. Use appropriate screws or nails, considering the type of wood and the desired strength. Pre-drilling pilot holes is recommended to prevent wood splitting. For added stability, consider using additional bracing between pallets. Assemble at least two walls before moving onto the next steps.

2.2 Floor Construction

If not using a pre-existing concrete or gravel base, construct a wooden floor. This can be achieved using additional pallets laid flat and secured together. Ensure the floor is level and provides a stable base for the walls. For enhanced strength and durability, consider using plywood or OSB (Oriented Strand Board) sheeting over the pallets.

2.3 Wall Assembly and Securing

Once the walls are constructed, position them on the prepared foundation or floor. Use additional bracing or corner supports to ensure the walls remain square and plumb. Secure the walls together using screws or nails, ensuring a strong and stable structure. Consider using additional support beams or posts for added structural integrity, especially for taller sheds.

2.4 Roof Construction

The roof construction requires careful planning. A simple gable roof is recommended for beginners. This involves constructing two triangular roof sections using pallets laid at an angle. Secure the roof sections to the top of the walls using appropriate fasteners. Ensure the roof has sufficient overhang to protect the walls from rain and snow. Consider adding roofing felt or a similar water-resistant material for additional protection.

2.5 Door Installation

The door can be constructed using additional pallets or purchased separately. If constructing a door from pallets, ensure it is sturdy and securely hinged to the wall frame. Consider adding a latch or lock for security. The door placement should be planned during the wall construction phase.

Phase 3: Finishing Touches and Refinements

This phase focuses on enhancing the aesthetics and functionality of the shed.
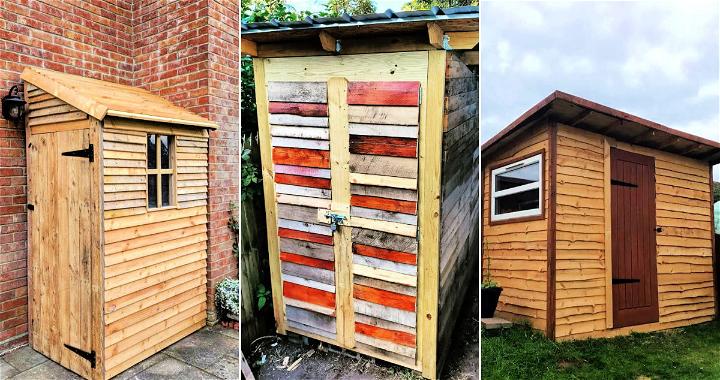
3.1 Weatherproofing

Apply a weatherproofing treatment to protect the wood from the elements. This may involve using a wood sealant, paint, or stain. Ensure the chosen product is suitable for exterior use and provides adequate protection against moisture and UV radiation. Pay particular attention to the joints and seams to prevent water ingress.

3.2 Internal Finishing

Consider adding shelves or other internal features to maximize storage space. This can be achieved using additional pallets or other suitable materials. Ensure the internal finishing enhances the functionality and usability of the shed.

3.3 Safety Considerations

Always wear appropriate safety gear, including safety glasses, gloves, and sturdy footwear during construction. Use caution when handling power tools and follow the manufacturer's instructions carefully. Dispose of waste materials responsibly and in accordance with local regulations.

Building a pallet shed is a rewarding project that allows for creativity and customization. By carefully following these steps and prioritizing safety, beginners can successfully construct a durable and functional storage solution. Remember that variations in pallet size and quality may require adjustments to the construction process. Always prioritize safety and structural integrity throughout the project.

Share:

Wood Pallet Shed Plans: A Complete DIY Guide for Backyard Storage

Wood Pallet Shed Plans: A Complete DIY Guide for Backyard Storage

Wood Pallet Shed Plans: A Complete DIY Guide for Backyard Storage

Transform discarded wood pallets into a charming and functional backyard shed! This comprehensive guide provides detailed plans and instructions for building your own pallet shed, saving you money and offering a rewarding DIY project. Forget expensive pre-fabricated sheds â€" let's build something unique and satisfying.

Planning Your Pallet Shed

Before you dive into the construction, careful planning is crucial. First, determine the size and location of your shed. Consider the space available in your backyard, the amount of storage you need, and any local building codes or restrictions. Sketch a simple plan, noting the dimensions and desired features. Next, gather your materials. You'll need a significant number of sturdy, untreated wood pallets (inspect them carefully for rot or damage), along with additional lumber for framing, roofing, and any internal shelving. Don't forget essential hardware: screws, nails, hinges, a latch, and weatherproofing materials.

Choosing the Right Pallets

Not all pallets are created equal. Prioritize pallets constructed from heat-treated lumber (stamped HT) as opposed to chemically treated lumber (MB). Heat-treated lumber is safer for your health and the environment. Inspect each pallet thoroughly for damage: look for cracks, warping, rot, or loose boards. You'll need a substantial number â€" the exact amount will depend on the size of your shed, but expect to use at least 15-20 depending on size.

Construction: Building the Foundation

Start by creating a level and stable foundation. A simple concrete slab is ideal, but you can also use compacted gravel or paving stones. Ensure your base is large enough to accommodate your shed's dimensions. Once the foundation is prepared, begin assembling the pallet walls. Securely fasten the pallets together using strong screws or nails, ensuring the structures are plumb and square. Use longer screws and consider adding corner bracing for extra support.

Framing and Roofing

After erecting the walls, construct the roof frame using additional lumber. The roof design can be simple â€" a gable or shed roof works well. Secure the roof frame to the top of the pallet walls. Then, cover the frame with plywood or roofing felt for weather protection. Finally, add asphalt shingles, metal roofing, or another suitable roofing material for durability and weather resistance. Remember to consider the local climate when selecting your roofing material.

Finishing Touches and Additional Features

Once the roof is complete, add a door (using additional lumber or repurposed pallet boards). Attach hinges and a latch. Consider adding windows for ventilation and light. For interior shelving, you can use more pallets or additional lumber. Finally, treat the entire shed with a wood preservative to protect it from the elements and extend its lifespan. A coat of paint or stain can add to its aesthetic appeal and further protect the wood.

Safety First!

Throughout the construction process, remember to prioritize safety. Always wear appropriate safety gear, including safety glasses and work gloves. Use caution when handling power tools and ensure the work area is well-lit and free of obstructions.

Maintaining Your Pallet Shed

Regular maintenance will extend the life of your pallet shed. Inspect it periodically for signs of damage or wear and tear. Re-apply wood preservative as needed, and promptly address any repairs to prevent further damage. By following these steps, your pallet shed will provide years of reliable backyard storage.

Share:

Beginner-Friendly Shed Plans for a Simple, Basic Structure

Beginner-Friendly Shed Plans for a Simple, Basic Structure

Building Your Dream Shed: A Beginner's Guide to Simple Shed Construction

Hey there! So you're thinking about building a shed? Awesome! It's a really rewarding project, and way more achievable than you might think. This guide is designed for absolute beginners â€" we'll walk through building a simple, basic shed step-by-step, making sure it's easy to understand even if you've never picked up a hammer before. Let's get started!

Planning Your Shed: Size, Location, and Materials

Before you even think about hammering a nail, you need a plan. This isn't about complex architectural drawings; it's about deciding on some basic things.

Choosing the Right Size

How much stuff do you need to store? A small shed (say, 6ft x 4ft) is perfect for tools and gardening supplies. Something larger (8ft x 10ft or even bigger) might be needed for lawnmowers, bicycles, and more. Think about what you'll be storing and add a little extra space â€" you'll thank yourself later!

Picking the Perfect Spot

Where will your shed live? Consider these things: access (easy to get to with a wheelbarrow?), level ground (super important!), sun exposure (do you want it sunny or shady?), and local regulations (check with your council or HOA to see if there are any rules about shed size or placement). Make sure you have enough space to work around the shed comfortably during construction.

Material Selection: Keeping it Simple

For a beginner-friendly shed, we're keeping things simple. Pressure-treated lumber is your best friend here. It's resistant to rot and insects, making it ideal for outdoor structures. You'll need:

  • Pressure-treated lumber for the frame (4x4 posts for the corners, 2x4s for the walls and roof)
  • Plywood or OSB (Oriented Strand Board) for the siding and roof sheathing
  • Roofing felt or shingles (shingles are more durable but felt is cheaper)
  • Nails, screws, and a level
  • A post hole digger or auger (for setting the posts in the ground)

Don't forget to grab some concrete for setting your posts â€" this is crucial for a stable shed!

Building the Foundation: A Solid Start

Your shed's foundation is the most important part. A wobbly foundation means a wobbly shed! We'll use concrete-set posts for this beginner-friendly approach.

Digging the Holes

Using your post hole digger, dig four holes â€" one for each corner post â€" that are deep enough to meet your local building codes (usually around 2-3 feet deep depending on your climate and soil type). Make sure the holes are spaced according to your shed's dimensions.

Setting the Posts

Place your 4x4 pressure-treated posts in the holes, ensuring they're perfectly plumb (vertical) using a level. Pour concrete into each hole, ensuring the posts are firmly embedded and the concrete level with the ground. Allow the concrete to fully cure (usually a day or two).

Framing the Walls and Roof: The Shed Takes Shape

Once the concrete is set, you can start building the frame of your shed. This is where having a helper will really come in handy!

Constructing the Walls

Using 2x4s, build the walls according to your planned dimensions. You can use a simple frame construction, with top and bottom plates and vertical studs. Remember to measure twice and cut once! Use a speed square to ensure accurate angles.

Assembling the Roof Frame

The roof frame is usually a simple gable roof (two sloping sides). You'll need to cut rafters to the correct length and angle. Again, a speed square will be your best friend here. Once the rafters are cut, attach them to the top plates of the walls. Add a ridge board at the top to connect the rafters.

Sheathing and Roofing: Protecting Your Investment

Now your shed has a skeleton; it's time to add skin and a roof.

Adding the Sheathing

Attach sheets of plywood or OSB to the walls and roof frame. Make sure they're securely fastened with nails. Try to keep the seams between sheets staggered for extra strength.

Installing the Roofing

Start by covering the roof with roofing felt, overlapping the sheets to prevent leaks. Then, install your chosen roofing material (shingles or more felt) following the manufacturer’s instructions. This is a crucial step in protecting your shed from the elements.

Finishing Touches: Adding the Door and Other Details

You're almost done! Now it's time for the finishing touches.

Installing the Door

Cut an opening in one of the walls for the door. You can buy a pre-made shed door or build one yourself using more 2x4s and plywood. Hang the door using hinges and add a latch.

Adding a Window (Optional)

If you want some natural light, cut an opening for a window. You can buy a pre-made window or create a simple one yourself using glass or plexiglass.

Commonly Asked Questions

Q: Do I need a building permit? A: It depends on your local regulations. Check with your city or county building department before starting construction.

Q: How long will this take? A: A simple shed like this can be built in a weekend or two, depending on your experience and the weather.

Q: Can I use recycled materials? A: For a beginner shed, sticking with new pressure-treated lumber is best. Recycled materials might not be as durable.

Q: What tools do I need? A: A hammer, saw (circular saw is recommended), measuring tape, level, drill, and a speed square are essential.

Q: What if I make a mistake? A: Don't worry! Everyone makes mistakes. Just take your time, double-check your measurements, and don't be afraid to ask for help.

Building a shed can be a really satisfying project. Remember to prioritize safety, take your time, and enjoy the process! Happy building!

Share:

Simple Pallet Shed Plans: A Quick and Easy DIY Project

Simple Pallet Shed Plans: A Quick and Easy DIY Project

Simple Pallet Shed Plans: A Quick and Easy DIY Project

The allure of a DIY project, particularly one that yields a practical and aesthetically pleasing structure like a shed, is undeniable. This guide offers comprehensive plans for constructing a simple yet sturdy shed using reclaimed pallets, minimizing costs while maximizing functionality. The project, while straightforward, requires careful planning and execution to ensure structural integrity and longevity. This detailed approach will enable even novice DIY enthusiasts to successfully complete this rewarding undertaking.

I. Planning and Preparation: Laying the Foundation for Success

Before embarking on construction, meticulous planning is paramount. This phase involves several critical steps that will significantly influence the final outcome and the overall ease of the project.

A. Site Selection and Assessment

The location of your pallet shed is crucial. Consider factors such as sun exposure, proximity to power sources (if needed for future electrical work), drainage, and accessibility. A level, well-drained site is ideal to prevent foundation issues. Assess the ground for any potential obstructions, such as underground utilities or large rocks. Clear the chosen area of debris and vegetation.

B. Material Acquisition and Inspection

Reclaimed pallets form the backbone of this project. Source pallets from reputable sources to ensure they are treated and structurally sound. Inspect each pallet carefully for signs of rot, pest infestation, or significant damage. Choose pallets of similar dimensions for consistent construction. You will need a sufficient quantity to build the walls, roof, and floor. Consider purchasing extra pallets to account for potential damage or imperfections.

C. Tool Inventory and Safety Precautions

Assemble the necessary tools before you begin. This typically includes:

  • Measuring tape
  • Level
  • Hammer
  • Screwdriver (both Phillips and flathead)
  • Drill with various drill bits
  • Circular saw or hand saw
  • Safety glasses
  • Work gloves
  • Post hole digger (if necessary for anchoring the structure)
  • Shovel (for ground preparation)

Prioritize safety throughout the construction process. Wear appropriate safety gear, such as safety glasses and work gloves, at all times. Ensure the work area is well-lit and free from obstructions. Follow all safety instructions related to power tools.

II. Foundation and Floor Construction: Establishing a Stable Base

A sturdy foundation is essential for a long-lasting shed. Several options exist, depending on the ground conditions and the desired level of permanence.

A. Preparing the Base

Clear the area of all vegetation and debris. Level the ground using a shovel and a level. If the ground is uneven, you may need to add gravel or compacted earth to create a level base. For improved drainage, consider adding a layer of landscape fabric before placing the pallets.

B. Pallet Floor Construction

Lay the pallets directly on the prepared base, ensuring they are level and tightly fitted together. You can use screws or heavy-duty nails to secure the pallets to each other and create a solid floor. Consider filling any gaps between the pallets with wood filler or sealant to prevent moisture penetration.

C. Optional Concrete Slab

For a more permanent and robust foundation, a concrete slab is recommended. This involves excavating the area, constructing a formwork, and pouring a concrete slab according to local building codes. Allow ample curing time for the concrete before proceeding with wall construction.

III. Wall Construction: Building the Shed's Structure

Constructing the walls involves careful planning and assembly of the pallets to create a stable structure.

A. Pallet Orientation and Assembly

Decide on the orientation of your pallets (vertical or horizontal) based on the desired aesthetic and structural considerations. Vertical orientation provides better stability, while horizontal orientation might be easier to assemble. Secure the pallets together using screws or nails, reinforcing the corners with additional bracing for strength and rigidity.

B. Wall Framing and Support

For added support, consider adding a simple frame made from 2x4 lumber to the corners and along the top of the walls. This will help to keep the pallets aligned and prevent sagging. Use appropriate fasteners to secure the frame to the pallets.

C. Door and Window Integration

Cut openings in the pallets to accommodate a door and any desired windows. This requires careful measurement and precise cutting to achieve a clean and functional result. Consider using pre-hung doors and windows for ease of installation. Reinforce the cutouts with additional framing to ensure structural integrity.

IV. Roof Construction: Completing the Structure

The roof provides essential protection from the elements. The chosen roof type depends on personal preference and available materials.

A. Simple Gable Roof

A gable roof is a relatively straightforward option. Construct a simple frame using 2x4 lumber, creating a triangular shape supported by the wall structure. Cover the frame with plywood or other suitable roofing material and seal appropriately. You could add a layer of waterproof roofing felt before installing the final roofing material.

B. Shed Roof Considerations

Ensure proper overhang to protect the walls from rain. Consider the slope of the roof to facilitate efficient water runoff. Use appropriate fasteners to secure the roofing material to the frame. Apply sealant to prevent water leakage.

V. Finishing Touches: Enhancing Functionality and Aesthetics

Once the main structure is complete, add finishing touches to enhance both the functionality and aesthetics of the shed.

A. Exterior Finishing

Consider applying a protective sealant or paint to the pallets to increase durability and enhance the appearance. Choose a weather-resistant finish appropriate for exterior use.

B. Interior Finishing

Depending on the intended use, you may want to add shelving, lighting, or other interior features. This could involve installing simple shelves made of additional pallets or other materials.

C. Additional Considerations

Ensure proper ventilation to prevent moisture build-up. Consider adding a lock to the door for security. Review local building codes and regulations to ensure compliance with all relevant requirements.

Building a pallet shed is a rewarding experience that combines creativity, practicality, and cost-effectiveness. By following these detailed plans and prioritizing safety, even novice DIY enthusiasts can construct a durable and functional storage solution. Remember that careful planning and attention to detail are key to a successful outcome. Enjoy the process and the satisfaction of creating something useful with your own hands.

Share:

DIY Lean-To Shed: How to Build a Simple Shed with Minimal Cost

DIY Lean-To Shed: How to Build a Simple Shed with Minimal Cost

DIY Lean-To Shed: A Comprehensive Guide to Economical Construction

Constructing a lean-to shed presents a compelling solution for those seeking additional storage space or a sheltered workshop area without incurring significant expenses. This guide provides a detailed, step-by-step approach to building a simple yet robust lean-to shed using readily available materials and minimizing costs. Careful planning and execution are crucial for a successful outcome, resulting in a functional and aesthetically pleasing addition to your property.

Phase 1: Planning and Design

Before commencing any construction, meticulous planning is paramount. This involves defining the shed's purpose, dimensions, and location, as well as selecting appropriate materials.

Defining the Shed's Purpose and Dimensions

The intended use of the shed dictates its necessary size and features. A simple storage shed for gardening tools requires less space than a workshop housing power tools and equipment. Carefully consider the items you intend to store or the activities you will perform within the shed. Measure these items to determine the minimum internal dimensions needed. Add extra space for comfortable movement and accessibility.

Typical lean-to shed dimensions range from 6ft x 8ft to 10ft x 12ft. Larger sheds may necessitate more complex construction techniques and stronger materials, increasing the overall cost.

Choosing the Location

Site selection is critical for both functionality and compliance with local building regulations. Consider the following factors:

  • Proximity to existing structures: The lean-to will be attached to an existing wall, so choose a wall with sufficient structural integrity and a suitable surface for attachment.
  • Accessibility: Ensure easy access for loading and unloading materials and for regular use of the shed.
  • Drainage: The location should have good drainage to prevent water accumulation around the shed's foundation.
  • Sunlight and wind exposure: Consider the orientation of the shed in relation to sunlight and prevailing winds to minimize heating and cooling costs and potential damage.
  • Building codes and permits: Check with your local authorities regarding building codes and permit requirements for shed construction.

Material Selection and Cost Estimation

Cost-effectiveness is a primary goal in this project. Recycled or reclaimed materials can significantly reduce expenses. Consider using pressure-treated lumber for the frame and floor to ensure durability and resistance to rot and insects. For the roofing, inexpensive options include corrugated metal sheeting, recycled asphalt shingles, or even heavy-duty plastic sheeting.

Create a detailed materials list including quantities and estimated costs from local suppliers. Include contingency for unexpected needs or material damage. This detailed list will allow for accurate budgeting and efficient purchasing.

Phase 2: Construction

With planning complete, the construction phase begins. This involves foundation preparation, frame construction, roofing, and finally, siding and finishing touches.

Foundation Preparation

A simple concrete slab or gravel base is suitable for a lean-to shed. The foundation should be level and adequately sized to support the shed's weight. For a concrete slab, ensure proper curing time before proceeding to the frame construction. A gravel base involves compacting a layer of gravel to provide a level and stable surface.

Frame Construction

The frame forms the structural backbone of the shed. Using pressure-treated lumber, construct a rectangular frame for the base, ensuring squareness and levelness. Erect vertical supports at regular intervals, securely attaching them to both the base frame and the existing wall. Add horizontal supports to reinforce the frame and provide a solid structure for the roofing and siding.

Use appropriate fasteners such as galvanized nails or screws to ensure secure connections. Consider using a spirit level and measuring tape frequently to ensure accuracy throughout the framing process. Proper bracing is critical to prevent racking and maintain structural integrity.

Roofing

The roof's design is crucial for effective water runoff. A simple single-slope roof is common for lean-to sheds. Attach the chosen roofing material (corrugated metal, asphalt shingles, or plastic sheeting) securely to the roof frame, ensuring proper overlap to prevent leaks. Seal any seams or joints with appropriate sealant to enhance water resistance.

Ensure the roof has sufficient overhang to protect the walls and foundation from rain and snow. Consider adding flashing around the edges of the roof where it meets the existing wall to further prevent water ingress.

Siding and Finishing Touches

Siding adds weather protection and improves the shed's appearance. Use inexpensive materials like plywood, shiplap, or even repurposed materials. Attach the siding securely to the frame, ensuring proper overlap and sealing any gaps to prevent drafts and water penetration.

Add a door and windows if needed, ensuring proper installation and weather sealing. Consider adding a simple locking mechanism for security. Apply a coat of exterior-grade paint or sealant to protect the wood and enhance its appearance.

Phase 3: Final Inspection and Maintenance

Upon completion, conduct a thorough inspection to identify and rectify any issues. Check for structural integrity, water tightness, and overall functionality. Address any imperfections before proceeding to regular maintenance.

Regular maintenance is key to prolonging the shed's lifespan. This includes inspecting the structure for damage, cleaning gutters and downspouts, and repairing any leaks or damage promptly. Regularly inspect the foundation for settling or damage, and address any issues immediately. A well-maintained lean-to shed will provide years of dependable service.

By carefully following these steps and prioritizing cost-effective solutions, constructing a functional and aesthetically pleasing lean-to shed can be achieved without compromising quality. Remember, proper planning, attention to detail, and regular maintenance are essential for a successful and long-lasting project.

Share:

How to Build a Lean-To Shed: A Quick and Simple DIY Guide

How to Build a Lean-To Shed: A Quick and Simple DIY Guide

How to Build a Lean-To Shed: A Quick and Simple DIY Guide

Dreaming of extra storage space but dreading complex construction projects? A lean-to shed is the perfect solution! This simple structure, attached to an existing building, offers ample storage with minimal effort. This guide provides a step-by-step walkthrough, empowering you to build your own lean-to shed with confidence.

Planning Your Lean-To Shed

Before you grab your tools, careful planning is crucial. First, determine the desired dimensions of your shed. Consider the available space against your existing building and the amount of storage you need. Next, secure the necessary permits from your local authorities; this step varies by location but is essential to avoid legal issues. Finally, sketch a detailed plan, including measurements for the walls, roof, and foundation. This plan will serve as your roadmap throughout the construction process, ensuring a smooth and efficient build.

Choosing Your Materials

Selecting the right materials impacts both the durability and the aesthetics of your lean-to. Pressure-treated lumber provides excellent rot resistance, making it ideal for the foundation and framing. For the roof, consider asphalt shingles for their affordability and ease of installation. Don't forget about fasteners â€" choose galvanized nails and screws for longevity. Finally, obtain any necessary concrete for the foundation, if needed. A well-considered material list ensures you have everything on hand before beginning.

Building the Foundation

A sturdy foundation is the cornerstone of any successful shed. If your lean-to is small and the ground is level, you can use a simple gravel base. However, for larger structures or uneven terrain, a concrete slab provides superior stability. Level the ground thoroughly before pouring the concrete (if applicable), ensuring a perfectly flat surface. Allow ample time for the concrete to fully cure before proceeding to the next step. Remember, a solid foundation ensures your lean-to will stand the test of time.

Framing the Walls and Roof

With the foundation in place, you're ready to frame your lean-to. Begin by constructing the side walls, using your pre-cut lumber and ensuring all corners are square. Next, attach the walls to your existing building, securing them firmly with appropriate fasteners. For the roof, construct rafters and connect them to the top of the walls. Consider using a ridge board at the peak of the roof for added support and stability. Precise measurements and careful construction are vital at this stage for a structurally sound lean-to.

Important Considerations for Framing

During framing, take extra care to:

  • Use a level to ensure all framing members are plumb and square.
  • Pre-drill holes for screws to prevent wood from splitting.
  • Employ appropriate safety measures, including wearing safety glasses and gloves.

Roofing and Finishing Touches

Once the framing is complete, it's time to install the roofing material. Start by applying underlayment to protect the wood from moisture. Then, carefully install your chosen roofing material, following the manufacturer's instructions. Finally, add flashing around the edges of the roof where it meets the walls and existing building to prevent water leakage. After roofing, consider adding finishing touches like doors, windows, and any desired siding. These final steps will transform your basic structure into a functional and attractive shed.

Safety First!

Throughout the entire process, prioritize safety. Wear appropriate safety gear, including safety glasses, work gloves, and sturdy footwear. Use caution when working with power tools and always ensure your work area is well-lit and free of obstacles. If you're unsure about any aspect of the construction, seek professional advice to avoid accidents and ensure a successful project.

Share:

Create a Unique Pallet Shed with These Free PDF Plans

Create a Unique Pallet Shed with These Free PDF Plans

Unlock Your Inner Builder: Construct a Unique Pallet Shed with Free PDF Plans

Tired of cluttered garages and overflowing storage spaces? Yearning for a charming, rustic addition to your property that doesn't break the bank? Then look no further! This guide empowers you to build a stunning, one-of-a-kind pallet shed, utilizing freely available PDF plans. We’ll walk you through the process, highlighting the unique advantages of using reclaimed pallets and offering tips to personalize your project, making it a true reflection of your style.

Why Choose a Pallet Shed?

Pallet sheds offer a compelling blend of affordability, sustainability, and aesthetic appeal. Reclaimed pallets, often discarded by businesses, provide a wealth of readily available, sturdy lumber. This eco-friendly approach reduces waste and significantly lowers construction costs compared to buying new materials. The inherent rustic charm of the wood lends itself to a variety of design styles, from ruggedly industrial to quaintly country. This allows you to create a shed that seamlessly blends with your existing landscape.

Finding and Preparing Your Pallets

Your journey begins with sourcing the pallets. Many businesses gladly give away used pallets, so start by contacting local retailers, breweries, or construction sites. Remember to check for treated lumber â€" look for the markings "HT" (heat-treated) which indicate safety for outdoor use. Avoid pallets marked "MB" (methyl bromide treated) as they contain harmful chemicals. Once you have your pallets, thoroughly inspect them for damage, removing any loose nails or splinters. You may need to clean them, depending on their condition. Consider using a wire brush to remove dirt and debris before beginning construction.

Essential Tools and Materials

Before you dive in, gather the necessary tools and materials. Beyond the pallets themselves, you’ll need things like a saw (circular saw is recommended), a hammer, a drill, screws, and possibly some additional lumber for reinforcing weak points or adding structural elements. The specific list will depend on your chosen PDF plan. Consult the plans carefully to ensure you have everything you need before starting.

Following the PDF Plans: A Step-by-Step Guide

With your materials ready, carefully review your chosen free PDF plans. These plans usually provide detailed diagrams, measurements, and step-by-step instructions. Take your time; accuracy is crucial for a structurally sound and aesthetically pleasing shed. Start by constructing the foundation, then work your way up, meticulously following each step outlined in the plans. Don’t hesitate to take breaks if needed â€" patience is key to a successful project.

Personalizing Your Pallet Shed

While following the plans is vital, this is where your creativity truly shines! Consider adding personal touches to make your shed unique. This could include painting the exterior a vibrant color, adding decorative trim, installing a charming window, or incorporating a custom door design. Think about the overall aesthetic you want to achieve and let your imagination guide your customizations.

Finishing Touches and Enjoying Your Creation

Once your shed is built, consider applying a weather-resistant sealant to protect the wood from the elements. This will extend the life of your shed and keep it looking its best for years to come. Finally, organize your belongings and enjoy your newly constructed pallet shed. Whether you’re using it for gardening tools, outdoor equipment, or simply as extra storage, your hard work will have created a functional and beautiful addition to your property â€" a testament to your building skills and resourceful spirit.

Remember to always prioritize safety when working with tools and building materials. If you're uncertain about any aspect of the construction process, consult with an experienced builder or handyman.

Share: